
Made up with this 43cm lump… certainly a river PB…on a Fishin Addict 3g rattling jigfly’ Greg Byatt
Made up with this 43cm lump… certainly a river PB…on a Fishin Addict 3g rattling jigfly’ Greg Byatt
The Ronnie rig has been pivotal in the capture of some of the biggest carp in the UK and on the continent in the last few years. Its immense hooking properties and ability to reset itself has made it a rig that so many top carp anglers will not be without today. Until fairly recently though, most of us had not even heard of this rig, let alone knew how to tie the ronnie rig. However, when you understand its amazing hooking mechanics it is hardly surprising it was kept a secret.

It is similar to the 360 rig, using a micro rig swivel to attach a pop up boilie to the hook but the increased length of the curved hook shank by utilising the kwik lock swivel and shrink tubing, which pulls straight when to fish is hooked, has meant that the concerns around mouth damage and hooks getting caught the landing net mesh are removed.
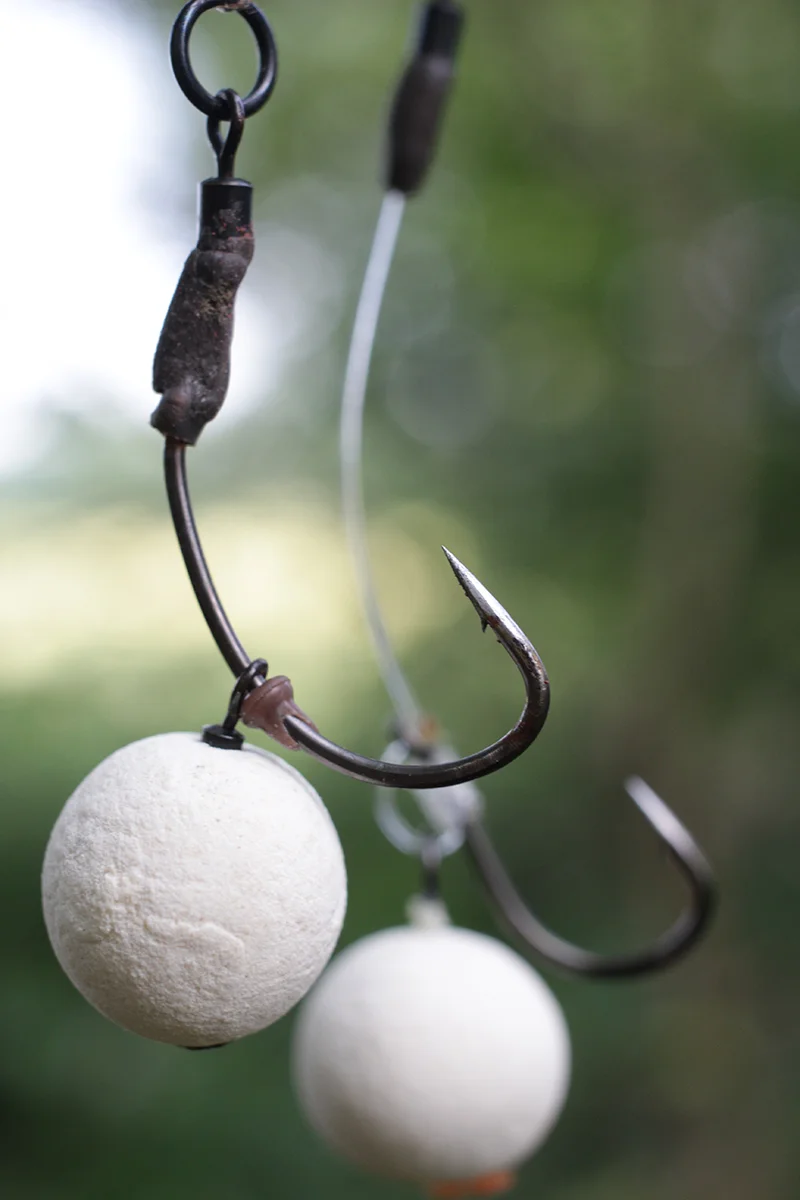
The Ronnie rig is essentially a low lying pop up rig, enabling the boilie subtly sit up just off the lake bed making it ideal for when there is not too much weed or debris.
The micro rig swivel allows the boilie to spin 360 degrees off the hook and the curved hook which pivots off the shrink tube and kwik lock swivel enables the rig to also easily rotate. The rig is able to maintain its aggressive hooking position at all times, yet with virtually no chance of tangling. This is what makes the Ronnie rig so brilliant and a rig that is here to stay.
To tie the rig you will need a size 4 or 6 curved shank hook, a micro rig swivel and hook stop, kwik lock rig swivel, shrink tubing, bait floss and your chosen hook link material.
Cut a piece of shrink tube about half an inch in length and slide it over the eye of the curve shank hook.


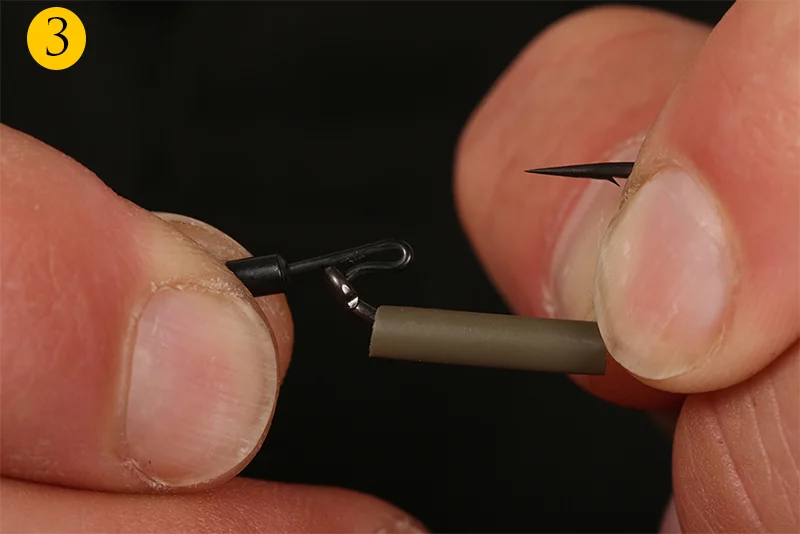
Take a kwik lock swivel and opening the crook slightly to pass the swivel through the eye of the hook

Use a pair of plyers to push to crook back into position.

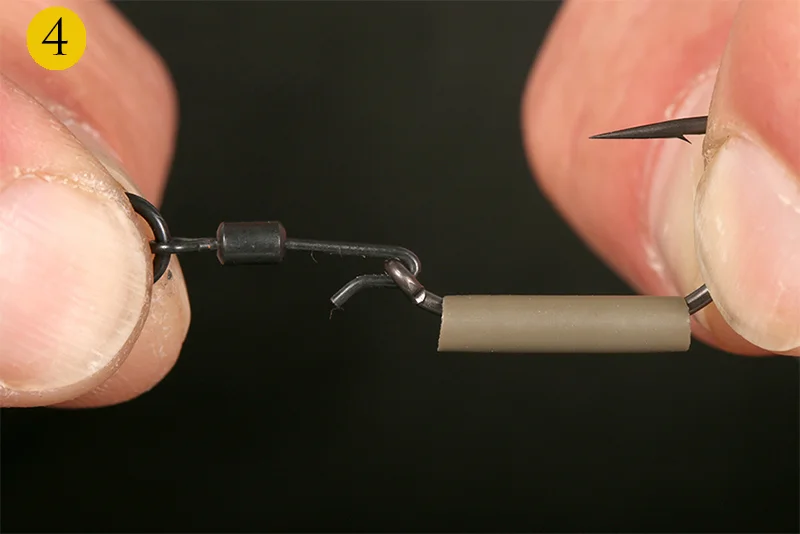
Push the shrink tube down the shank of the hook, over the hook eye and over the barrel of the kwick lock swivel.

Next steam the shrink tube over a kettle to fix the shrink tube in place

Slide the micro rig swivel onto the hook

Push the rubber stopper onto the hook which ensures the rig swivel stays on the hook and gives the hook additional movement which helps with the hooking mechanics when the carp picks up the bait.


Attached a pop up boilie to the micro rig swivel using bait floss and secure the boilie by blobbing the bait floss down with a lighter.

To perfectly balance the rig take some rig putty and carefully mould it around the shrink tube until to rig slowly sinks with the hook sat up off the lake bed

Finally attach the rig to your hook link material and cast to you chosen area.


CREDIT TO : 2020 Dream Carp Holidays
“A few of the boys noticed I was catching a lot more than them. I eventually showed them and through word of mouth they all wanted them. It’s mostly Perch we fish for and find the evenings a lot better. I find the best set up for these lures a simple Carolina rig. Watermelon I my favourite. Regards Rob 👍 “


Ragworms come from a large family of phylum annelids, many of which are polychaetes, or bristle worms. Now you know that let’s identify the ones that are important to sea anglers.
Here we are going to focus our attention on red ragworms, as opposed to the whites and others that anglers will come across. Biggest worm in the range is the spectacular king rag (nereis virens), the common red rag, (nereis diversicolor), and the harbour rag, (hediste diversicolor).
Starting with the biggest, king rag are usually about 30cm long but are known to reach up to a metre in length. If you look carefully at the head of the king rag you should be able to make out two pairs of eyes and four pairs of antennae. Anglers are more concerned about the reversible proboscis containing a very impressive set of pincers, which can give you a sharp nip if you are not careful. King rag are loners and it’s rare to find concentrated colonies of the really bigger specimens.
The common red rag grows to around 15cm and is more likely to be found in reasonably dense colonies in harbours and estuaries. These are the worms that are stocked by most tackle shops.
Harbour rag, also known as maddies or wrigglers, grow to around 8cm and are nearly always found in dense colonies. This worm lives in a vertical burrow and can reach quite high densities in sheltered estuaries where conditions are usually unsuitable for other species.
It is easily identified by a red dorsal blood vein, which runs down the centre of its body. It is an important food source for many species of estuarine wading birds.
Reproduction depends on the species. In most species the sexes are separate but there are a few that are both male and female (hermaphrodite). When they spawn the males change to a light green and the females to a dark bottle green.
The ragworm is both a scavenger and an efficient predator feeding on mud, detritus and plankton. When in hunting mode it can rapidly shoot out its powerful jaws to catch other softbodied animals.
They all inhabit much the same type of ground in sheltered harbours and estuaries and favour broken muddy and sandy ground.
They can also be found close to mussel beds and in some cases the king rag will live in very rocky ground where it is relatively protected and where it can grow to a very large size.

With a bit of planning you can gather your own ragworms for bait, but first you have to identify a broken muddy or sandy location where the ground is reasonably firm and well exposed during a big low tide.
Be careful in harbours where the mud can be thick black and oozy. If you wear Wellington boots you will get stuck and even wearing waders doesn’t mean you are safe from getting bogged down.
Search for rocks and stones, turning them over to find the holes and channels the worms make. If you are careful, quiet and turn the stone over quickly you should be able to grab the odd ragworm in your hand before it disappears down its burrow.
After turning over the rocks to find some tell-tale holes you should dig. If the ground is hard try a flat-tined potato fork that also offers less chance of cutting the worm in half.
Harbour rag can usually be found in the top 30cm of the ground and the bigger worms will be a bit deeper, up to 70cm in some cases. If there are lots of worms dig trench style working back along the trench to expose any worms. Normally it is necessary to have a good look around, find a suitable small area of ground before digging and then moving onto another spot.
Surface water often runs into the hole if the ground is very soft. If this happens use a spade using a small bucket to bale out the water.
You can dig a lot deeper and quicker with a spade. Your tools must be strong because they will be used as a lever just as much as a digging implement.
When exposing a worm try to lift it out of the hole with the next dig rather than trying to pull it out, which can break the worm. Try to vary where you dig as well. On big tides start at the furthest exposed point and leave the top of the beach for smaller tides.
You might find that the worms are easier to gather by digging right on the edge of the ebbing tide when the ground is still wet and the worms have yet to move deeper.
Worms seem to know when the tide is flooding and move upwards in anticipation of a supply of fresh seawater, in which case try digging right on the edge of the water line.
Warm weather usually brings the worms up to the surface, and very cold frosty weather will drive the worms a lot deeper in the mud.
Big king rag are dug individually. Foot pressure can often result in a spurt of water coming out of a hole and sometimes you will find bits of seaweed, that the worm has tried to take, sticking out of a hole.
Dig a small trench at the side of its burrow and then try to follow the hole as it twists and turns down through the ground. This is hard work but can produce some massive worms once you know what to look out for.
Washing your worms
When you have enough bait wash off your tools and then fill your main container with fresh seawater, rinsing the worms out thoroughly.
Separate the broken ones into your smaller baling bucket, which then fits inside the bigger bucket. If you leave whole and broken worms in the same container the water will quickly turn orange and on a warm day in a car boot the worms will die.
Back home the whole worms go into a bucket of clean seawater aerated by an air pump for a few hours; this gives the worms time to expel any mud that is still in their system.
Missed broken worms go into a separate shallow tray with containing a few millimetres of water, while whole worms that may be damaged go into a different tray. The good quality hole worms go into other trays all covered by a few millimetres of water.
All the worms are stored in a fridge, which not only keeps them cool but also in the dark. Change the water twice a day to keep your worms healthy.

Quick tips
● When you go fishing keep bait parcels of newspaper, which helps to toughen them up, in a large bucket. If it’s a hot day put a small freezer block in the bucket.
● The size of the worms can make a difference to results. Small worms are more effective for catching small fish, large worms are best for specimen fish. Ask your tackle dealer for the size you need or request a mix of sizes.
● Can’t face handling a ragworm because of their pincers? Cut off the head with your scissors.
● Cocktail baits are deadly for lots of species. There are no rules that say you cannot mix two, three or more baits. Beware of masking the hook point though and use a hook size that suits the size of the bait.
● An excellent guide to what hook to use is to match the size and pattern to the bait being used. Long-shank hooks in size 1/0, 1 and 2 are best for worms and sandeels. Use short-shank hooks up to 3/0 for crabs and fish, with mediumshank hooks in size 6/0 suited to squid and live fish.
● Keep your bait out of the wind, rain and sun and it will retain its freshness longer. A cool box is as useful in the winter as in summer to keep bait fresh and alive.

Rag worm lug worm imitation soft lures pack of 10 units – Fishin Addict
£2.99
There are rigs and then there is the “Ronnie rig”. Some rigs stand the test of time and work year after year. Others are more transient in nature, their tangible benefits are the figment of a twisted mind, and they don’t offer any real advantage in terms of catching carp or being easy to tie!
This one, however, is very special. It’s a rig that’s been used successfully on the quiet for a few years now, being deployed as a tool pivotal in catching some phenomenal big carp from a number of waters. But now the word is out and everyone want’s to know how to tie this amazing rig
The Ronnie rig is easy to tie and offers the benefits of a super-consistent low pop-up presentation, fished the height of a hook and a swivel of off the lakebed, but without the issues of a naked hook eye that has the potential to snag in landing-net meshes (one of the main problems associated with the original 360-style rigs).
It offers all the advantages and awesome rig mechanics of the hinged stiff rig, but without the need to trying to fish it low to the lakebed, which isn’t the optimum arrangement. When it’s tied right, those of us that have used it extensively have pure unadulterated confidence in it because hook-pulls are almost non-existent. I can’t remember pulling out of a single fish with the Ronnie rig.
Luckily, it’s amazingly simple to construct thanks to the use of a size 12 Covert Kwik-Lok Flexi Ring Swivel mounted on the eye of the hook. That, combined with a Gardner Mugga hook, offers a highly aggressive, fast-reacting presentation that is ruthless in the extreme!
It’s also extremely versatile. I always have a number of pre-prepared hook sections ready to go, and I tailor the hooklink material to suit the lakebed or the lead arrangement.
That could mean a lead clip with a long, supple, skinned hooklink such as Ultra Skin in silt, or a helicopter-style arrangement and a Subterfuge fluorocarbon boom on clean sand and gravel.
Personally, I think balancing it like a hinged stiff rig works best – so the hookbait is slow to sink. Why? If you overbalance the hook by moulding putty around the shrink tube, the hook has a tendency to lie over further and this inhibits it from twisting and turning as quickly as it could (the same drawback you get with a hinged stiff rig).
Realistically, mounting the swivel through the eye means you need to use a ‘nice’ sized hook, and the size 4 Mugga or Continental Mugga are both perfect. You know, some rigs work with some hooks better than others, and this is the one. The Mugga’s curved swept shank and 20-degree inturned eye complement and enhance the mechanics, lining up the shrink tube naturally in a way that gives maximum ‘twistiness’.
Variants of some rigs come and go, but the Ronnie rig is one that I know will stand the test of time. Like all presentations, it isn’t the panacea of all things riggy, but what it is is the best low pop-up rig that I have used.
Now it’s time to show you how to tie this amazing rig so you can go out and use it for yourself!


FA-06 Drop Shot fishing hooks #6 – Super sharp made of fine Japanese carbon steel wire


120mm 55g with ball bearing rattle and good quality hooks.
Select from:
ROACH – Super scales
PERCH – Stripy
RED ALERT – Red and White

The season for targeting pike (Esox Lucius) opens on the 1st October and closes at the end of the fishing season 14th March.
The oxygen levels are on the way up and the water is starting to clear. ……Its time to tackle up.
New tackle from FISHIN ADDICT on sale here.
http://www.ebay.co.uk/sch/howell3638/m.html?_nkw=&_armrs=1&_ipg=&_from=

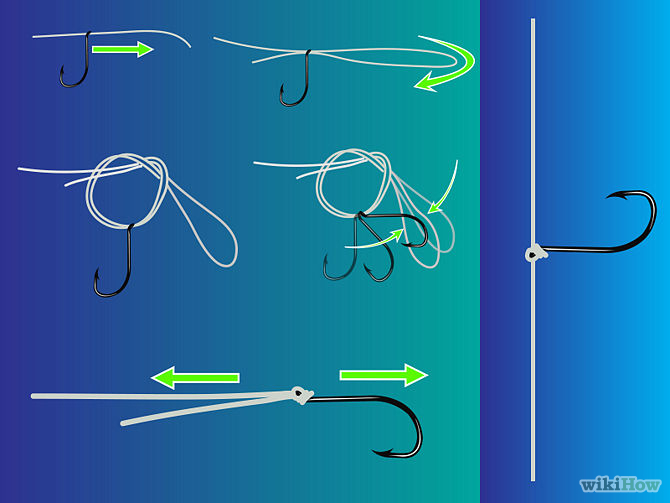
The drop-shot rig is a finesse technique that has taken the USA bass fishing world by a storm. Recently it has started to be popular on UK waters and is proving to a killer technique for perch. A drop-shot rig will often catch fish when reaction baits won’t do the trick.
Steps


Tips
…. plus special underwater footage