Posted on

How to Tie the Ronnie Rig

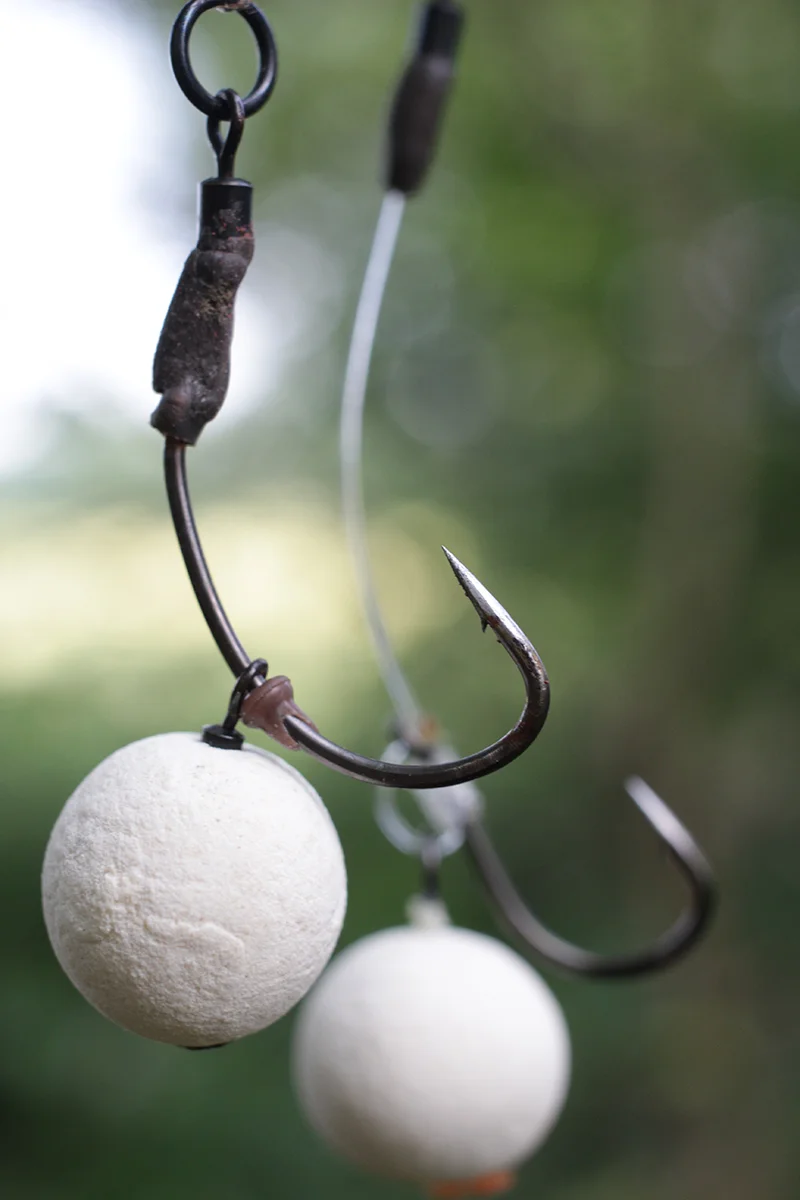
The Ronnie rig has been pivotal in the capture of some of the biggest carp in the UK and on the continent in the last few years. Its immense hooking properties and ability to reset itself has made it a rig that so many top carp anglers will not be without today. Until fairly recently though, most of us had not even heard of this rig, let alone knew how to tie the ronnie rig. However, when you understand its amazing hooking mechanics it is hardly surprising it was kept a secret.

how to tie the ronnie rig

It is similar to the 360 rig, using a micro rig swivel to attach a pop up boilie to the hook but the increased length of the curved hook shank by utilising the kwik lock swivel and shrink tubing, which pulls straight when to fish is hooked, has meant that the concerns around mouth damage and hooks getting caught the landing net mesh are removed.

The Ronnie rig is essentially a low lying pop up rig, enabling the boilie subtly sit up just off the lake bed making it ideal for when there is not too much weed or debris.

The micro rig swivel allows the boilie to spin 360 degrees off the hook and the curved hook which pivots off the shrink tube and kwik lock swivel enables the rig to also easily rotate. The rig is able to maintain its aggressive hooking position at all times, yet with virtually no chance of tangling. This is what makes the Ronnie rig so brilliant and a rig that is here to stay.

How to Tie the Ronnie Rig

To tie the rig you will need a size 4 or 6 curved shank hook, a micro rig swivel and hook stop, kwik lock rig swivel, shrink tubing, bait floss and your chosen hook link material.

Step 1

Cut a piece of shrink tube about half an inch in length and slide it over the eye of the curve shank hook.

How to tie the ronnie rig step 1

Step 2

Take a kwik lock swivel and opening the crook slightly to pass the swivel through the eye of the hook
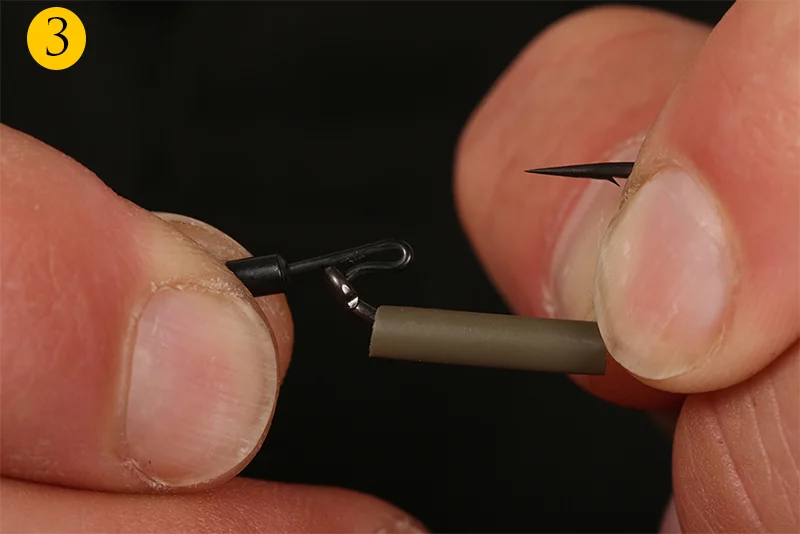
How to tie the ronnie rig step 2

Step 3

Use a pair of plyers to push to crook back into position.
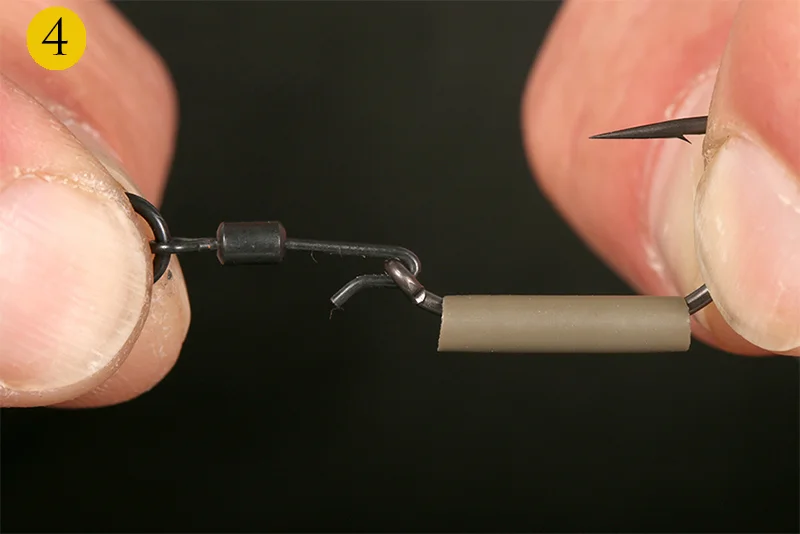
How to tie the ronnie rig step 3

Step 4

Push the shrink tube down the shank of the hook, over the hook eye and over the barrel of the kwick lock swivel.

How to tie the ronnie rig step 4

Step 5

Next steam the shrink tube over a kettle to fix the shrink tube in place

How to tie the ronnie rig step 5

Step 6

Slide the micro rig swivel onto the hook

How to tie the ronnie rig step 6

Step 7

Push the rubber stopper onto the hook which ensures the rig swivel stays on the hook and gives the hook additional movement which helps with the hooking mechanics when the carp picks up the bait.

How to tie the ronnie rig step 7

Step 8

Attached a pop up boilie to the micro rig swivel using bait floss and secure the boilie by blobbing the bait floss down with a lighter.

How to tie the ronnie rig step 8

Step 9

To perfectly balance the rig take some rig putty and carefully mould it around the shrink tube until to rig slowly sinks with the hook sat up off the lake bed

How to tie the ronnie rig step 9

Step 10

Finally attach the rig to your hook link material and cast to you chosen area.

How to tie the ronnie rig step 10
How to Tie the Ronnie Rig

CREDIT TO : 2020 Dream Carp Holidays

Ronnie Rig carp ready rig pre tied-12mm boilie screw barbed or barbless and hook sizes #4, #6 or #8 – Fishin Addict

Posted on

HOW TO TIE THE RONNIE RIG!

There are rigs and then there is the “Ronnie rig”. Some rigs stand the test of time and work year after year. Others are more transient in nature, their tangible benefits are the figment of a twisted mind, and they don’t offer any real advantage in terms of catching carp or being easy to tie!

This one, however, is very special. It’s a rig that’s been used successfully on the quiet for a few years now, being deployed as a tool pivotal in catching some phenomenal big carp from a number of waters. But now the word is out and everyone want’s to know how to tie this amazing rig

How to tie the  Ronnie rig

The Ronnie rig is easy to tie and offers the benefits of a super-consistent low pop-up presentation, fished the height of a hook and a swivel of off the lakebed, but without the issues of a naked hook eye that has the potential to snag in landing-net meshes (one of the main problems associated with the original 360-style rigs).

It offers all the advantages and awesome rig mechanics of the hinged stiff rig, but without the need to trying to fish it low to the lakebed, which isn’t the optimum arrangement. When it’s tied right, those of us that have used it extensively have pure unadulterated confidence in it because hook-pulls are almost non-existent. I can’t remember pulling out of a single fish with the Ronnie rig. 

Luckily, it’s amazingly simple to construct thanks to the use of a size 12 Covert Kwik-Lok Flexi Ring Swivel mounted on the eye of the hook. That, combined with a Gardner Mugga hook, offers a highly aggressive, fast-reacting presentation that is ruthless in the extreme!

It’s also extremely versatile. I always have a number of pre-prepared hook sections ready to go, and I tailor the hooklink material to suit the lakebed or the lead arrangement.  

That could mean a lead clip with a long, supple, skinned hooklink such as Ultra Skin in silt, or a helicopter-style arrangement and a Subterfuge fluorocarbon boom on clean sand and gravel.   

Personally, I think balancing it like a hinged stiff rig works best – so the hookbait is slow to sink. Why? If you overbalance the hook by moulding putty around the shrink tube, the hook has a tendency to lie over further and this inhibits it from twisting and turning as quickly as it could (the same drawback you get with a hinged stiff rig).

Realistically, mounting the swivel through the eye means you need to use a ‘nice’ sized hook, and the size 4 Mugga or Continental Mugga are both perfect. You know, some rigs work with some hooks better than others, and this is the one. The Mugga’s curved swept shank and 20-degree inturned eye complement and enhance the mechanics, lining up the shrink tube naturally in a way that gives maximum ‘twistiness’.

Variants of some rigs come and go, but the Ronnie rig is one that I know will stand the test of time. Like all presentations, it isn’t the panacea of all things riggy, but what it is is the best low pop-up rig that I have used. 

Now it’s time to show you how to tie this amazing rig so you can go out and use it for yourself!

HOW TO TIE

STEP 1) 

Start by cutting a 1cm length of large Covert shrink tubing.

STEP 2)

You then position the shrink tubing on the hook shank.

 STEP 3)

Attach the hook to a size 12 Kwik Lok Flexi Ring swivel.

STEP 4)

The crook will distort slightly as it is opened up.

STEP 5)

So once the hook eye is in place squeeze the crook closed with pliers.

STEP 6)

Now bring the shrink tubing back down the hook to this position.

STEP 7)

Carefully shrink the tubing down using the steam from a kettle.

STEP 8) 

Now you can slide a size 20 Target Swivel on to the hook.

STEP 9)

Follow this with a hook stop to keep the swivel in place

STEP 10)

Position the hook stop opposite the barb as shown here. 

STEP 11) 

Attach your pop-up hookbait with some bait floss. 

STEP 12)

Mould some tungsten putty around the shrink tube to balance the bait.